The plugin works only with Eclipse 3.3+. The install instructions are quite simple, although depending on your Eclipse version some details like button names may vary. Do not worry though – the installation shouldn’t take you more than 5 minutes.
After you have it installed you can configure its settings for every project you have in your workspace. You can choose what kind of bugs you want FindBugs to look for, how are they reported and when is FindBugs run. The nice thing is that you really do not have to do that as the default settings are pretty reasonable. To get to the settings menu you have to right click on the project and then choose Properties > FindBugs. It looks like this:
After all is configured it is time to run the FindBugs. If you have not set it to run automatically you can start it by right clicking on your project and choosing FindBugs > FindBugs. Below is an example of a code that has been analyzed by FindBugs.
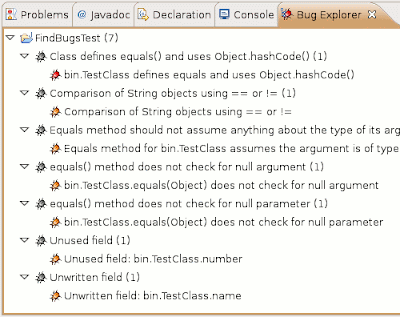
Notice the little bug markers on the left side of the code – they point to the places where errors have been found. If you move your cursor over them you will get a list of all issues detected – exactly like with regular Eclipse Java warnings. All those errors can also be seen in a ‘Bug Explorer’ window with additional description. To see this window go to Window > Show View > Other > FindBugs > Bug Explorer. For our code sample the list of errors is as following:
As you can see FindBugs found 7 problems with the code. Have you managed to find them all by yourself? Even if you did you probably see that it is much easier and safer to have FindBugs to detect those for you.
 Posted in:

